
Making Of – Tutorial
Please note this tutorial has been written in 2012. Old versions of 3D Studio Max and Photoshop have been used

PART 1: 3D Studio Max
Step 1: Reference photographs
At the start of a project, I am used to spend some time saving as many photos and reference as possible.
In this particular case, I always wanted to create an image showing where I am coming from, my roots. Something a bit more nostalgic. Then I searched images of Corsican villas and old houses. Here what popped up:
- Stonewall, stone beam, wood shutter + wrought iron latches
- Gnomon
- Wrought iron wall lamp
- Mediterranean vegetation (succulents, olive trees, lavender, rosemary, etc….)
Thus, with a little folder of ref, I know a bit better what direction I'm taking.
Step 2: Set up of my scene
As I don’t like using too many views in my interface, I set up my viewport in 2 parts:
My camera on the LHS. And on the RHS the working view in orthogonal; which allows seeing parallels, easier for snapping. I can quickly switch from a view to another with the shortcuts T, L et F if needed.
On the LHS, I have the Safe Frame on (4x3), then I can see the center of the image and work with the rule of third.
Step 3: Modeling
Decking :
FloorGenerator and a material by element applied to the mesh, with
8 ID and it’s ready to go.
Stone walls :
Textures found on the Internet with some retouches for the bump, displace and specular. A subdivide modifier and
a VrayDisplacement mod.
Planting :
Directly imported from my Library Evermotion and Xfrog plants. With some adjustments on the 3D models and shaders
to suit my scene and settings.
For the ivy, just the Ivy Generator from Guruware.
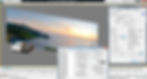
The most important was to find the background matching the feeling I wanted, with the right lighting, the sun
direction and of course in good resolution. After a bit, I finally found that photo (5783 x 1737) matching exactly my needs.
I bring it in my scene in a plan which has the exact same dimensions.
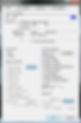
In Object Properties, I untick: Receive Shadows, Cast Shadows and Apply Atmospherics
Then in VRay Properties, I also untick: Generate GI, Receive GI and Visible to GI.
Step 4: Lighting
This is finally the fun part! :)
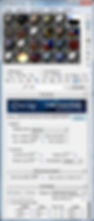
First, the HDRI. I have used an HDRI that has similar lighting and tones than my background image found on the internet earlier.
In this case, it is the HDRI nº8 of the VizPeople V2 pack.
I use a VRayHDRI Material (called ENV) that I drag as an instance in the Environment slot (Keyboard + 8).
In order to visualize it in my viewport : Alt+B Et I tick Use Environment Background and Display Background.
Some settings :
Click right on the Background plan>> Object Properties and reduce the visibility (temporary) to see the HDRI' sun and the horizon line (from my camera*).
In the Material Editor (Key M), to properly set up my HDRI, I use the horizontal rotation and correctly match the HDRI' sun with the background sun.
– Remember to set the background's visibility back to 1 –
I usually leave the gamma at 1 for exteriors. some intensity tweaks and that's pretty good!
* See the settings below
Sun set up :
In order to set up my sun correctly, I use a little trick:
I create a new VRay Camera (with a target) that I call CAM-TO-SUN and change its colour to yellow, to allow future easy selections.
Then, I align it to the target of my sun and align its target to the sun. When shifting to that camera view. it is then easy to align the HDRI sun to the VRay sun. Please note you might decrease temporarily the HDRI intensity to see properly its sun in the viewport.
Depending on the scene and the HDRI, you might need to add a VRay Light Dome with your HDRI instanced in the Use Texture slot
Pool Lights :
To simulate the blue diffuse up-lighting from the pool, a simple blue-ish VRay Light is enough and would light up a bit the pool area.
I've used a basic omni for the caustics, with a map in the Projector Map slot, then just need to adjust the intensity; here it's about 1.5.
For the pool spotlights, a good IES might suffice.


Step 5: VRay Camera & settings
In my settings, I'm used to set the burn value quite low (about 0.3) to avoid any burnt
areas, I can then, later increase the brightness in postproduction if needed.
VRayCam :
- Exposure ticked
- Untick vignetting as I like to add it in Photoshop later
- In White Balance I choose Neutral
- I tick Horizon Line, which allows me to see the horizon and place my background
correctly
Now, with some very quick low-resolution tests, I can adjust the luminosity.
Lower a bit the shutter speed and/or increase the ISO. (For an interior scene, it might
be required to lower the f-number)


Water Shader :
It's important to respect the realistic refraction Indice of water 1.33 in order to generate realistic refraction.
I have also reduced the glossiness to 0.98 to simulate chlorian inside the water.

PART 2: Photoshop
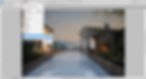
Step 1: Raw Render
In order to open all my passes at once, I use: File > Scripts > Load Files into Stack

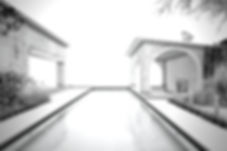
Raw render below

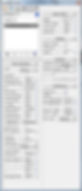
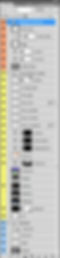
Then I organise my layers in groups :
- RENDERS which contains the raw render (the RGB), a few 2D objects added later in post-prod and other small patches if needed.
- ADJUSTMENT LAYERS which contains passes, colour corrections, curves, masks, smart objects, etc...
- OVERALL EFFECTS which contains overall adjustments, global curves and contrast, vignettes and glows.
Here the image half-done with only the Adjustments group visible.

I am not going to detail this part too long as it's only local tweaks and personal liking.
However, what will add some life and vibe to the image is what is in the Overall group:
HIGH PASS : Allows to increase and bring back the details.
.
CROSS PROCESSING :
It's a photographic process that helps to enhance colors and contrasts that could have been lost by the CG look. It helps to make the render more photorealistic.

Final Render
